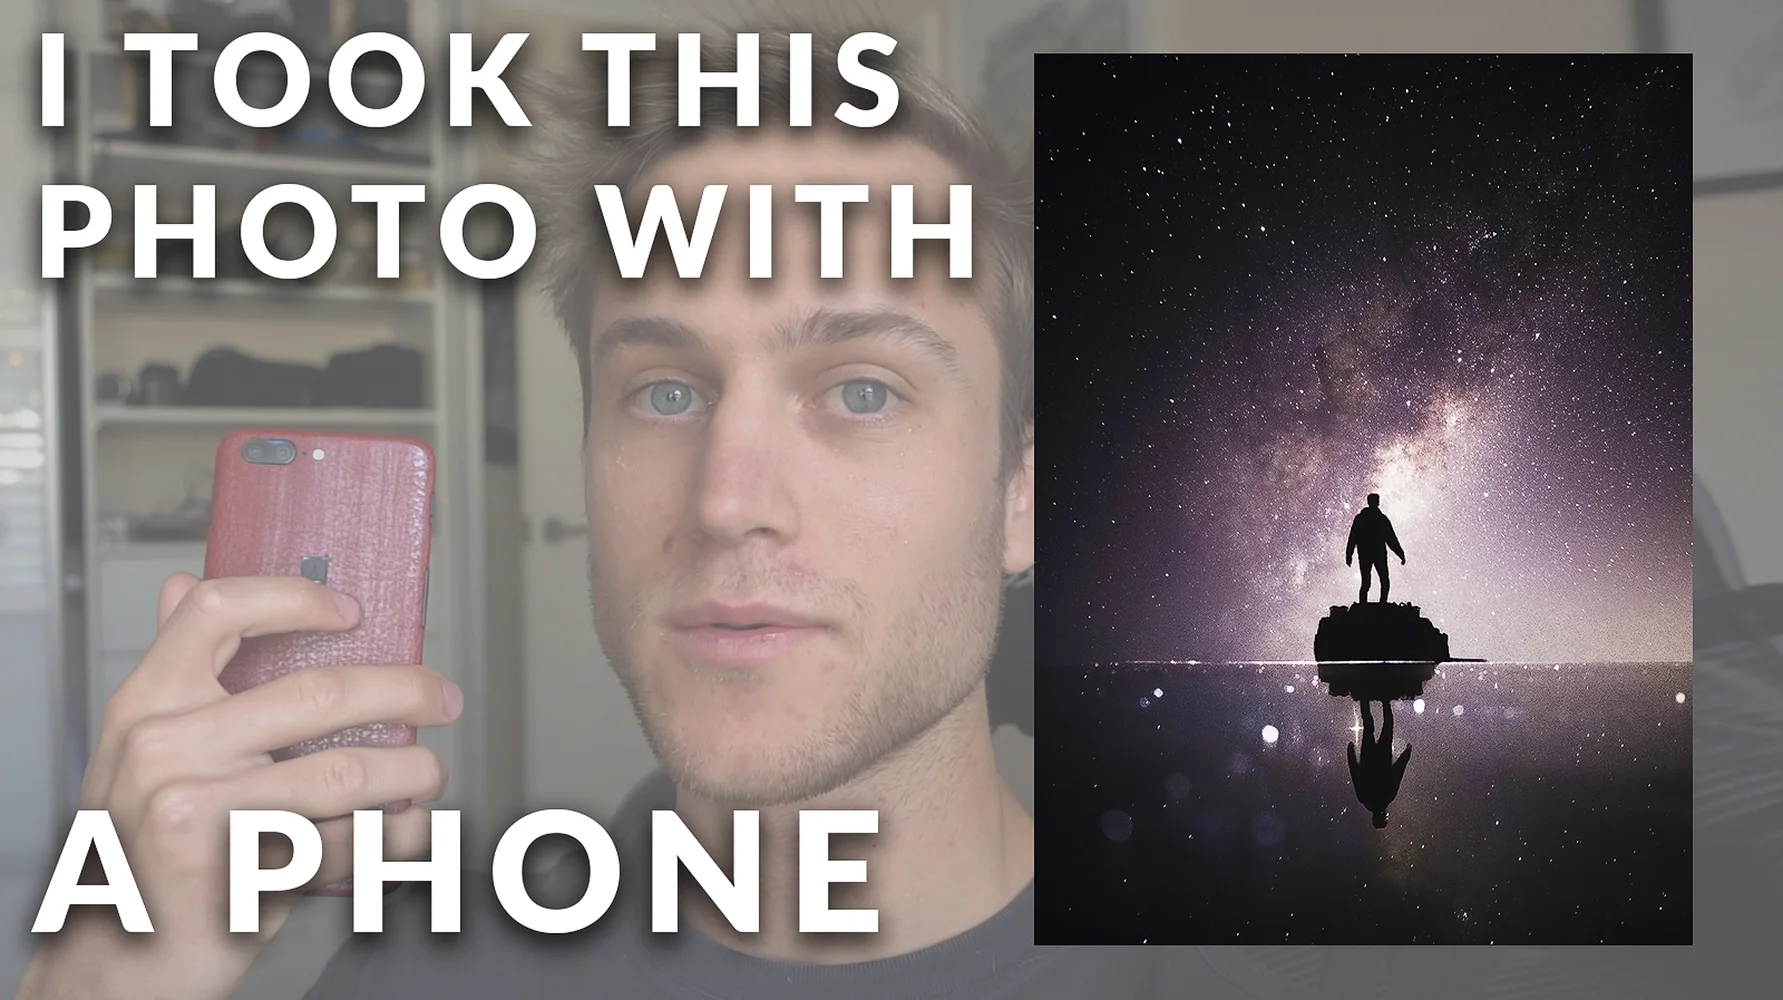
Astrophotography With A Phone - OnePlus 5
RAW photograph (No editing)
Edited RAW photograph (Edited on my phone)
Edited RAW / Stacked photograph (Edited on my computer)
With smartphones now allowing us to use their cameras in manual mode, we can push them to their limits to create photos that weren't ever possible.
The best part about smartphone cameras is their wide aperture. Most smartphone cameras will have an aperture of F/1.8 which basically means that it can let in a lot of light. This is perfect for astrophotography because we need to capture as much light as we can within a certain amount of time (before the stars begin to move).
In the following video I'll show you how to set up your phone to take photos of the Milky Way with a cheap DIY plastic cup tripod and how to edit it in Lightroom and Photoshop!
Watch my smartphone astrophotography tutorial here
The Basics
Firstly, you need to check if your phone lets you use manual camera controls. A quick Google search will let you know if you can do this with your phone. If not, don't fret, you can usually override the phone by downloading a manual camera app such as:
Camera Pro
VSCO Cam
Manual Camera
ProShot
For my tutorial, I used a OnePlus 5 and which allows you to use manual settings in the 'Pro Mode' of the default camera app which is awesome!
The OnePlus 5 also has some additional settings such as a self timer and custom user settings to save your camera settings for later use!
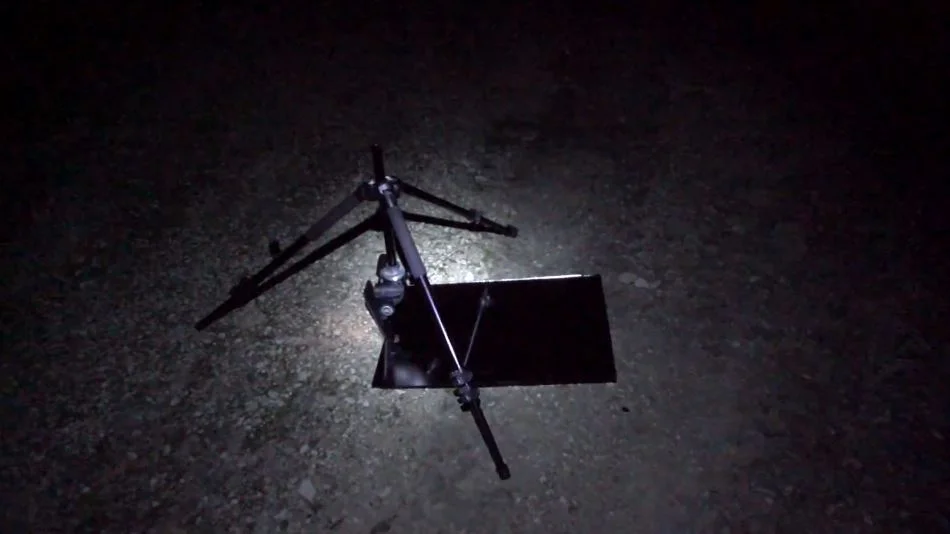
The Tripod
You'll be needing a tripod to keep your camera still for 30 seconds while it takes the photo. In my video I demonstrate how to make a super simple DIY tripod out of a plastic cup. This legit cost me like 5 cents.
I also show you how to modify a professional tripod with velcro which allows you to get better angles.

Cup Tripod
Modified velcro tripod
The Settings
You'll be needing to capture as much light as you can from some very far away objects... So let me explain what settings are best for you!
ISO (2000 - 6400)
You need to set your ISO as high as it can go. ISO makes the camera sensor more sensitive to light (at the cost of introducing digital noise to the photo, but this can be easily removed in Photoshop). Your phone will have an ISO limit, but my personal recommendation is 3200 ISO and to not go above 6400 ISO, otherwise there will be too much digital noise.
Shutter Speed (20 - 30 seconds)
30 seconds should do it. I wouldn't go any longer than 30 seconds otherwise you will start to see the stars trailing in your photo. At 30 seconds there will be some trailing, but not enough to notice on a phone screen or computer.
Focus (Set to'Infinity')
You are trying to focus on objects that are so far away that its difficult to comprehend.
So you just need to set you focus to infinity (AKA as far as you camera can focus). For the OnePlus 5 this focus is denoted by a small mountain symbol.
Aperture
The only phone that can adjust aperture is the Samsung Galaxy S9. In this case, you want to use F/1.5 and not F/2.4. This is because the lower the 'F' number, the wider the aperture blades become! And you want that as wide as you can to let in as much light as you can (My OnePlus 5 has an aperture of F/1.7).
Taking the Photo
Unfortunately not everyone can just go out to their backyard and point their camera at the sky to capture the Milky Way. You need to be away from light pollution, which for me is about a 40 minute drive north away from the city into the country.
To check where light pollution is low where you live, use this website: https://www.lightpollutionmap.info/
For reference, I took my photo somewhere around that red circle.

Secondly, you need to take the photo when the moon either:
Isn't very bright (0 - 25% moon)
OR it's on the other side of the Earth when your taking the photo. (Yes, the moon isn't always out at night!)
This is because the moon is actually really bright at night when compared to the Milky Way. So when the moon is too bright, it's just as bad as light pollution for taking photos of the Milky Way.
You can check this stuff by looking at a moon phase calendar for your specific hemisphere and checking its setting and rise times.
I use the following website to check the moon phase: http://www.moontracks.com/
The Milky Way also moves! So for the more advanced user, I suggest using Stellarium which is a computer app that lets you check where the Milky Way is at night. The Milky Way Core (Which is what I took a photo of) is only visible during the months of March through to September. I recommend May / June / July as the Milky Way Core is in its best position during these months.
Now you just need to get out there and take the photo! For a more detailed demonstration of taking the photo, the video will do a much better job than any body of text. So go check that out!
Cheers,
Matty
@matthewreillyphotography
